Como imprimir automaticamente anexos quando os emails chegarem no Outlook?
Este tutorial demonstra um método para combinar um script VBA e uma regra do Outlook para ajudá-lo a imprimir automaticamente os anexos de determinados emails assim que eles chegarem no Outlook.
Imprimir automaticamente anexos quando determinados emails chegarem
Suponha que você deseja imprimir automaticamente os anexos dos emails recebidos de um remetente específico. Você pode fazer o seguinte para realizar isso.
Passo 1: Criar um script no Outlook
Primeiro, você precisa criar um script VBA no Outlook.
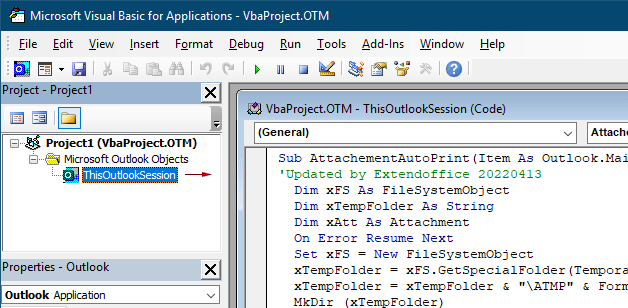
1. Abra seu Outlook, pressione simultaneamente as teclas Alt + F11 para abrir a janela Microsoft Visual Basic for Applications.
2. Na janela Microsoft Visual Basic for Applications, clique duas vezes em Project1 > Microsoft Outlook Objects > ThisOutlookSession para abrir a janela ThisOutlookSession (Código), e depois copie o código a seguir para esta janela de código.
Código VBA 1: Imprimir automaticamente anexos (todos os tipos de anexos) quando os emails chegarem
Sub AttachementAutoPrint(Item As Outlook.MailItem)
'Updated by Extendoffice 20230223
  Dim xFS As FileSystemObject
  Dim xTempFolder As String
  Dim xAtt As Attachment
  Dim xShell As Object
  Dim xFolder As Object, xFolderItem As Object
  Dim xFileName As String
  On Error GoTo xError
  If Item.Attachments.Count = 0 Then Exit Sub
  Set xFS = New FileSystemObject
  xTempFolder = xFS.GetSpecialFolder(TemporaryFolder)
  xTempFolder = xTempFolder & "\ATMP" & Format(Item.ReceivedTime, "yyyymmddhhmmss")
  If Not xFS.FolderExists(xTempFolder) Then
    MkDir (xTempFolder)
  End If
  Set xShell = CreateObject("Shell.Application")
  Set xFolder = xShell.NameSpace(0)
  For Each xAtt In Item.Attachments
    If IsEmbeddedAttachment(xAtt) = False Then
      xFileName = xTempFolder & "\" & xAtt.FileName
      xAtt.SaveAsFile (xFileName)
      Set xFolderItem = xFolder.ParseName(xFileName)
      xFolderItem.InvokeVerbEx ("print")
    End If
  Next xAtt
  Set xFS = Nothing
  Set xFolder = Nothing
  Set xFolderItem = Nothing
  Set xShell = Nothing
xError:
  If Err <> 0 Then
    MsgBox Err.Number & " - " & Err.Description, , "Kutools for Outlook"
    Err.Clear
  End If
Exit Sub
End Sub

Function IsEmbeddedAttachment(Attach As Attachment)
Dim xItem As MailItem
Dim xCid As String
Dim xID As String
Dim xHtml As String
On Error Resume Next
IsEmbeddedAttachment = False
Set xItem = Attach.Parent
If xItem.BodyFormat <> olFormatHTML Then Exit Function
xCid = ""
xCid = Attach.PropertyAccessor.GetProperty("http://schemas.microsoft.com/mapi/proptag/0x3712001F")
If xCid <> "" Then
    xHtml = xItem.HTMLBody
    xID = "cid:" & xCid
    If InStr(xHtml, xID) > 0 Then
        IsEmbeddedAttachment = True
    End If
End If
End Function
Observação: Este código suporta a impressão de todos os tipos de anexos recebidos nos emails. Se você quiser imprimir apenas um tipo específico de anexo, como arquivos pdf, aplique o seguinte código VBA.
Código VBA 2: Imprimir automaticamente o tipo especificado de anexos quando os emails chegarem
Sub AttachementAutoPrint(Item As Outlook.MailItem)
'Updated by Extendoffice 20230223
  Dim xFS As FileSystemObject
  Dim xTempFolder As String
  Dim xAtt As Attachment
  Dim xShell As Object
  Dim xFolder As Object, xFolderItem As Object
  Dim xFileType As String, xFileName As String
  On Error GoTo xError
  If Item.Attachments.Count = 0 Then Exit Sub
  Set xFS = New FileSystemObject
  xTempFolder = xFS.GetSpecialFolder(TemporaryFolder)
  xTempFolder = xTempFolder & "\ATMP" & Format(Item.ReceivedTime, "yyyymmddhhmmss")
  If Not xFS.FolderExists(xTempFolder) Then
    MkDir (xTempFolder)
  End If
  Set xShell = CreateObject("Shell.Application")
  Set xFolder = xShell.NameSpace(0)
  For Each xAtt In Item.Attachments
    If IsEmbeddedAttachment(xAtt) = False Then
      xFileName = xAtt.FileName
      xFileType = LCase$(Right$(xFileName, VBA.Len(xFileName) - VBA.InStrRev(xFileName, ".")))
      xFileName = xTempFolder & "\" & xFileName
      Select Case xFileType
        Case "pdf"   'change "pdf" to the file extension you want to print
          xAtt.SaveAsFile (xFileName)
          Set xFolderItem = xFolder.ParseName(xFileName)
          xFolderItem.InvokeVerbEx ("print")
      End Select
    End If
  Next xAtt
  Set xFS = Nothing
  Set xFolder = Nothing
  Set xFolderItem = Nothing
  Set xShell = Nothing
xError:
  If Err <> 0 Then
    MsgBox Err.Number & " - " & Err.Description, , "Kutools for Outlook"
    Err.Clear
  End If
  Exit Sub
End Sub

Function IsEmbeddedAttachment(Attach As Attachment)
Dim xItem As MailItem
Dim xCid As String
Dim xID As String
Dim xHtml As String
On Error Resume Next
IsEmbeddedAttachment = False
Set xItem = Attach.Parent
If xItem.BodyFormat <> olFormatHTML Then Exit Function
xCid = ""
xCid = Attach.PropertyAccessor.GetProperty("http://schemas.microsoft.com/mapi/proptag/0x3712001F")
If xCid <> "" Then
    xHtml = xItem.HTMLBody
    xID = "cid:" & xCid
    If InStr(xHtml, xID) > 0 Then
        IsEmbeddedAttachment = True
    End If
End If
End Function
Observações:
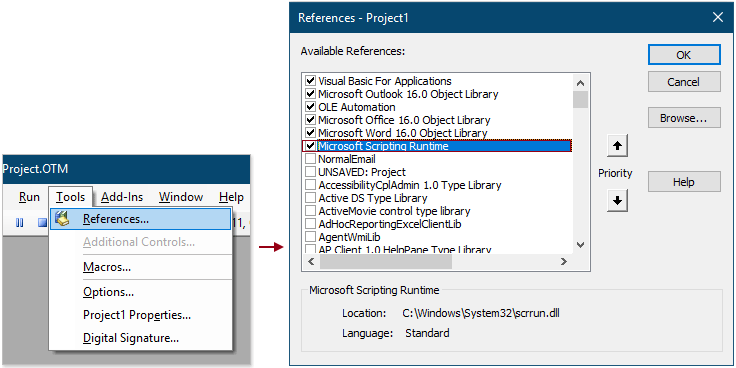
3. Avance e clique em Ferramentas > Referências. No diálogo que aparece Referências – Project1, marque a caixa Microsoft Scripting Runtime e clique no botão OK.
4. Salve o código e pressione as teclas Alt + Q para fechar a janela Microsoft Visual Basic for Applications.
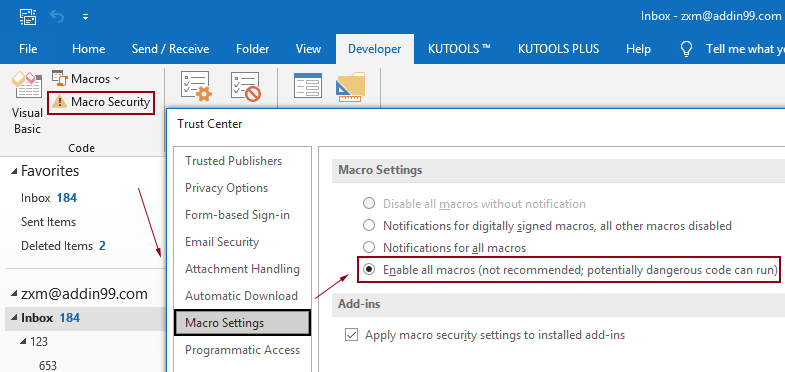
Observação: Certifique-se de que a opção Ativar todas as macros está habilitada no seu Outlook. Você pode verificar essa opção seguindo os passos mostrados abaixo.
Passo 2: Criar uma regra para usar o script
Depois de adicionar o script VBA no Outlook, você precisa criar uma regra para usar o script com base em certas condições.
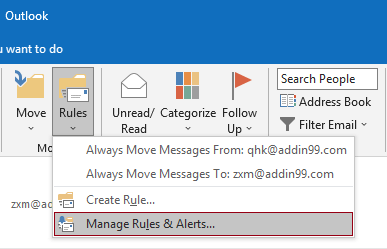
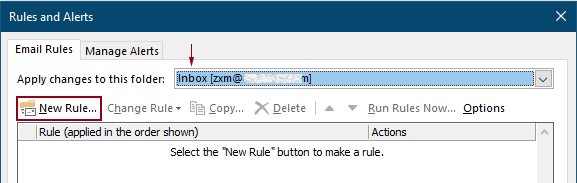
1. Vá para a guia Início, clique em Regras > Gerenciar Regras e Alertas.
2. Na caixa de diálogo Regras e Alertas, clique no botão Nova Regra para criar uma regra.
Dica: Se você adicionou várias contas de email ao seu Outlook, especifique uma conta na lista suspensa Aplicar alterações a esta pasta onde deseja aplicar a regra. Caso contrário, ela será aplicada à caixa de entrada da conta de email selecionada atualmente.
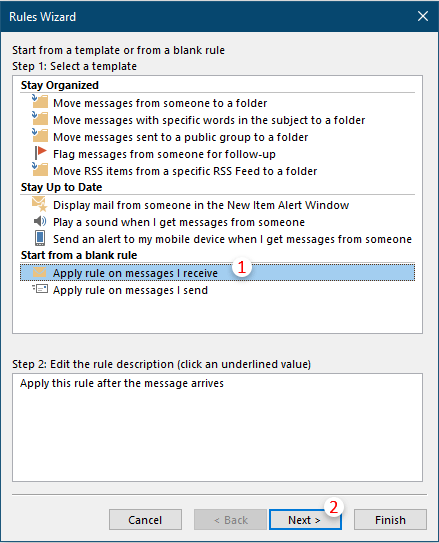
3. No primeiro Assistente de Regras, selecione Aplicar regra nas mensagens que eu receber na Caixa 1, e depois clique em Próximo.
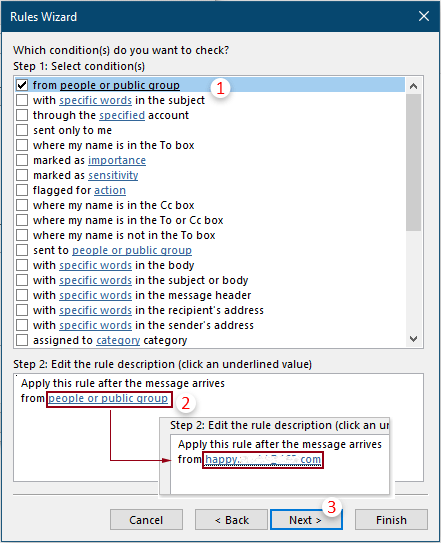
4. No segundo Assistente de Regras, você precisa:
5. No terceiro Assistente de Regras, você precisa configurar conforme a seguir.
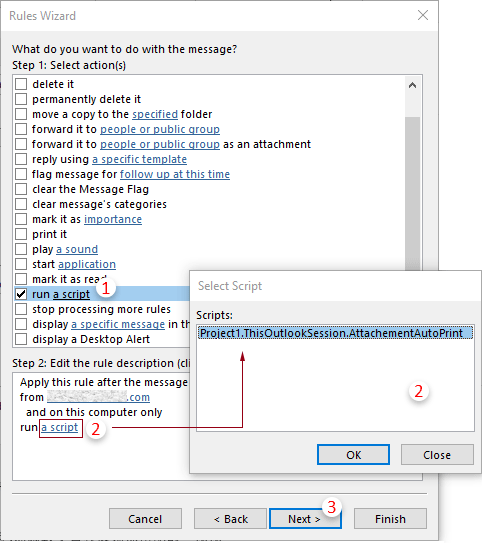
Dica: Se a opção “executar um script” estiver ausente no seu Assistente de Regras, você pode exibi-la seguindo o método mencionado neste artigo: restaurar a opção Executar Um Script faltante na regra do Outlook.
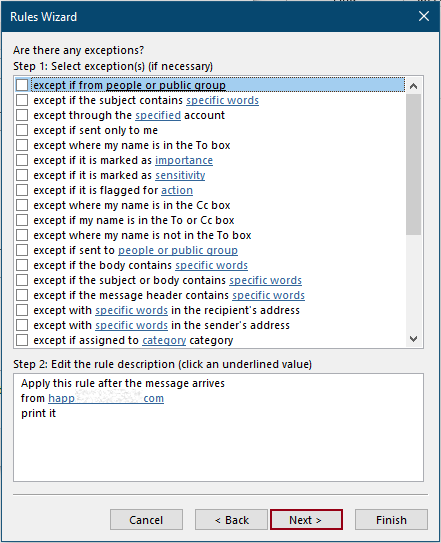
6. Depois disso, outro Assistente de Regras aparecerá perguntando por exceções. Você pode selecionar as exceções, se necessário, caso contrário, clique no botão Próximo sem fazer nenhuma seleção.
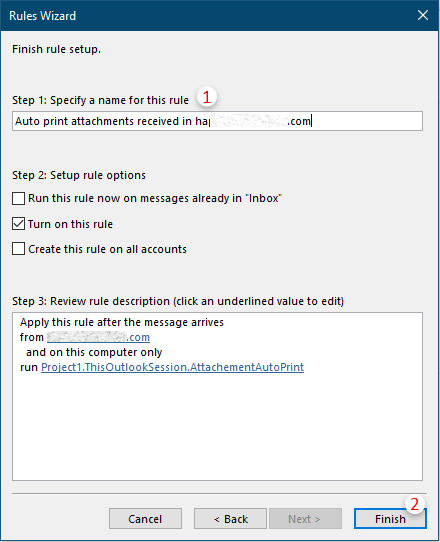
7. No último Assistente de Regras, você precisa especificar um nome para a regra e clicar no botão Finalizar.
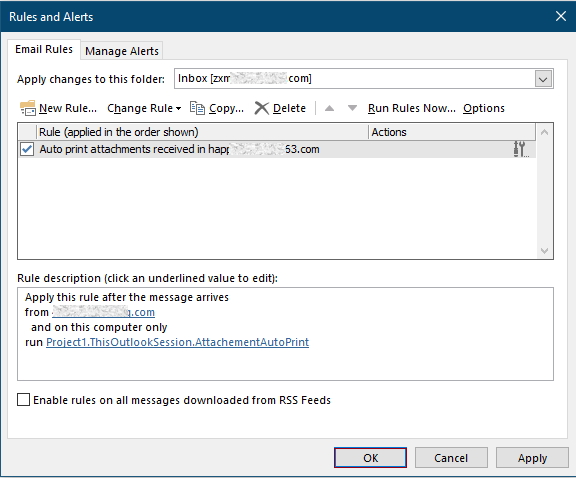
8. Em seguida, ele retorna à caixa de diálogo Regras e Alertas, você verá a regra criada listada lá dentro, clique no botão OK para finalizar toda a configuração.
A partir de agora, quando um email da pessoa especificada for recebido, os arquivos anexados serão impressos automaticamente.
Artigos relacionados
Imprimir somente Anexos de um Email ou Emails Selecionados no Outlook
No Outlook, você pode imprimir os emails, mas já imprimiu apenas os anexos de um email ou emails selecionados no Outlook? Este artigo apresenta truques para resolver essa tarefa.
Imprimir somente o cabeçalho da mensagem de um email no Outlook
Ao imprimir um email no Outlook, ele imprimirá tanto o cabeçalho quanto o corpo da mensagem no email. No entanto, em alguns casos especiais, você pode precisar apenas imprimir o cabeçalho da mensagem com o assunto, remetente, destinatários, etc. Este artigo introduzirá duas soluções para fazer isso.
Imprimir um calendário em um intervalo de datas específico/personalizado no Outlook
Normalmente, ao imprimir um calendário na visualização Mensal no Outlook, ele selecionará automaticamente o mês que contém a data selecionada atualmente. No entanto, você pode precisar imprimir o calendário dentro de um intervalo de datas personalizado, como 3 meses, metade do ano, etc. Este artigo apresentará a solução para você.
Imprimir um contato com foto no Outlook
Normalmente, a foto de um contato não será impressa ao imprimir o contato no Outlook. Mas às vezes, pode ser mais impressionante imprimir um contato com sua foto. Este artigo apresentará algumas soluções alternativas para fazer isso.
Imprimir uma seleção de um email no Outlook
Se você recebeu uma mensagem de email e descobriu que há uma parte específica do conteúdo do email que precisa ser impressa em vez de imprimir toda a mensagem, o que você faria? Na verdade, o Outlook pode ajudá-lo a realizar essa operação com a ajuda de navegadores da internet, como o Firefox e o Internet Explorer. Aqui vou usar os navegadores da internet como exemplo. Por favor, veja os tutoriais a seguir.
Melhores Ferramentas de Produtividade para Office
Notícia de Última Hora: Kutools para Outlook Lança Versão Gratuita!
Experimente o novo Kutools para Outlook com mais de100 recursos incríveis! Clique para baixar agora!
📧 Automação de E-mail: Resposta automática (Disponível para POP e IMAP) / Agendar Enviar Email / CC/BCC automático por Regra ao Enviar Email / Encaminhamento automático (Regra avançada) / Adicionar Saudação automaticamente / Dividir automaticamente Emails com múltiplos destinatários em Email individuais ...
📨 Gerenciamento de Email: Recallar Email / Bloquear emails fraudulentos por Assunto e outros critérios / Excluir Duplicado / Pesquisa Avançada / Organizar Pastas ...
📁 Anexos Pro: Salvar em Lote / Desanexar em Lote / Comprimir em Lote / Salvar automaticamente / Desanexar automaticamente / Auto Comprimir ...
🌟 Magia da Interface: 😊Mais emojis bonitos e legais / Notificações de emails importantes / Minimizar Outlook em vez de fechar ...
👍 Recursos de um clique: Responder a Todos com Anexos / Emails Anti-Phishing / 🕘Exibir o fuso horário do remetente ...
👩🏼🤝👩🏻 Contatos e Calendário: Adicionar contato em lote dos Email selecionados / Dividir um Grupo de Contatos em grupos individuais / Remover lembrete de aniversário ...
Utilize o Kutools no idioma que preferir — disponível em Inglês, Espanhol, Alemão, Francês, Chinês e mais de40 outros!


🚀 Download com um clique — Baixe todos os complementos de Office
Recomendado fortemente: Kutools para Office (5 em1)
Um clique para baixar cinco instaladores de uma vez — Kutools para Excel, Outlook, Word, PowerPoint e Office Tab Pro. Clique para baixar agora!
- ✅ Comodidade em um clique: Baixe todos os cinco pacotes de instalação em uma única ação.
- 🚀 Pronto para qualquer tarefa no Office: Instale os complementos que você precisa, quando precisar.
- 🧰 Inclui: Kutools para Excel / Kutools para Outlook / Kutools para Word / Office Tab Pro / Kutools para PowerPoint