Como exportar e salvar cada planilha como uma nova pasta de trabalho separada no Excel?
Exportar e salvar planilhas individuais como pastas de trabalho separadas no Excel é uma tarefa comum, especialmente ao compartilhar ou organizar dados. Embora copiar e colar manualmente as planilhas em novas pastas de trabalho seja uma opção, pode ser tedioso e demorado, especialmente para pastas de trabalho com várias planilhas. Neste guia, exploraremos vários métodos para alcançar isso passo a passo, ajudando você a escolher a melhor solução com base em suas necessidades e conhecimentos.
Salvar planilhas como nova pasta de trabalho uma por uma com o comando Mover ou Copiar
Usar o comando "Mover ou Copiar" ajudará você a exportar ou copiar rapidamente uma ou várias planilhas para uma nova pasta de trabalho.
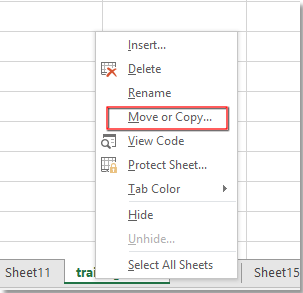
Passo 1: Selecione os nomes das planilhas na barra de abas. Para selecionar várias planilhas, mantenha a tecla "Ctrl" pressionada e clique nas abas das planilhas uma por uma.
Passo 2: Clique com o botão direito do mouse no nome da planilha e clique em "Mover ou Copiar" no menu de contexto.
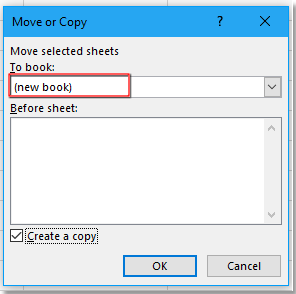
Passo 3: Na caixa de diálogo "Mover ou Copiar", selecione o item "(nova pasta de trabalho)" na lista suspensa de "Mover planilhas selecionadas para a pasta de trabalho".
Passo 4: Em seguida, clique em "OK", agora você terá mudado para a "nova pasta de trabalho" com as planilhas exportadas ou copiadas, clique em "Arquivo" > "Salvar" para salvar a nova pasta de trabalho.
Observação: Na caixa de diálogo "Mover ou Copiar", há uma opção "Criar uma cópia". Se você não marcar essa opção, ela moverá as planilhas selecionadas para fora da pasta de trabalho original; se marcá-la, ela copiará as planilhas selecionadas.
Salve facilmente várias planilhas como nova pasta de trabalho com o Kutools para Excel
Se você tiver várias planilhas que precisam ser salvas como pastas de trabalho separadas, o primeiro método não é uma boa escolha. E o código VBA abaixo pode ser um pouco complicado para iniciantes no Excel. Aqui você pode usar o utilitário "Separar Pasta de Trabalho" do "Kutools para Excel" para salvar facilmente cada planilha de uma pasta de trabalho em pastas de trabalho separadas.
Após instalar o Kutools para Excel, clique em "Kutools Plus" > "Pasta de Trabalho" > "Separar Pasta de Trabalho" para abrir a caixa de diálogo "Separar Pasta de Trabalho". Em seguida, configure conforme segue.
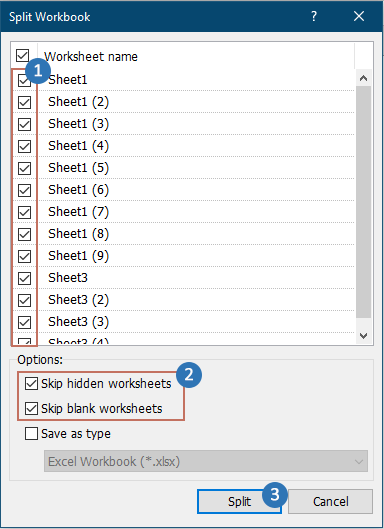
- Marque as planilhas que deseja salvar como novas pastas de trabalho. Por padrão, todas as planilhas estão marcadas.
- É opcional pular planilhas ocultas e em branco marcando as caixas de seleção correspondentes na seção "Opções".
- Clique em "OK".
- Uma caixa de diálogo "Selecionar Pasta" aparecerá, então você precisa selecionar uma pasta de destino para salvar as novas pastas de trabalho e clicar no botão "Selecionar Pasta".

Em seguida, as planilhas especificadas ou todas as planilhas serão salvas como novas pastas de trabalho separadas imediatamente.
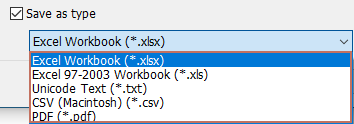
- Este recurso permite que você salve cada planilha como arquivos TXT, CSV ou PSF individuais. Basta marcar a caixa de seleção Salvar como tipo e escolher a opção correspondente de que você precisa no menu suspenso.
- Para usar este recurso, você deve ter o "Kutools para Excel" instalado no seu computador. Acesse download Kutools para Excel agora.

Exportar e salvar planilhas como nova pasta de trabalho com código VBA
O seguinte código exportará cada planilha visível em uma nova pasta de trabalho e salvará a pasta de trabalho com o nome da planilha original em uma nova pasta criada no mesmo caminho da pasta de trabalho ativa. Siga as etapas a seguir:
Passo 1: Pressione as teclas "ALT" + "F11" e abrirá a janela "Microsoft Visual Basic for Applications".
Passo 2: Clique em "Inserir" > "Módulo" e cole a seguinte macro na Janela do Módulo:
VBA: Exportar e salvar planilhas como nova pasta de trabalho em uma nova pasta.
Sub SplitWorkbook()
'Updateby20200806
Dim FileExtStr As String
Dim FileFormatNum As Long
Dim xWs As Worksheet
Dim xWb As Workbook
Dim xNWb As Workbook
Dim FolderName As String
Application.ScreenUpdating = False
Set xWb = Application.ThisWorkbook
DateString = Format(Now, "yyyy-mm-dd hh-mm-ss")
FolderName = xWb.Path & "\" & xWb.Name & " " & DateString
If Val(Application.Version) < 12 Then
FileExtStr = ".xls": FileFormatNum = -4143
Else
Select Case xWb.FileFormat
Case 51:
FileExtStr = ".xlsx": FileFormatNum = 51
Case 52:
If Application.ActiveWorkbook.HasVBProject Then
FileExtStr = ".xlsm": FileFormatNum = 52
Else
FileExtStr = ".xlsx": FileFormatNum = 51
End If
Case 56:
FileExtStr = ".xls": FileFormatNum = 56
Case Else:
FileExtStr = ".xlsb": FileFormatNum = 50
End Select
End If
MkDir FolderName
For Each xWs In xWb.Worksheets
On Error GoTo NErro
If xWs.Visible = xlSheetVisible Then
xWs.Select
xWs.Copy
xFile = FolderName & "\" & xWs.Name & FileExtStr
Set xNWb = Application.Workbooks.Item(Application.Workbooks.Count)
xNWb.SaveAs xFile, FileFormat:=FileFormatNum
xNWb.Close False, xFile
End If
NErro:
xWb.Activate
Next
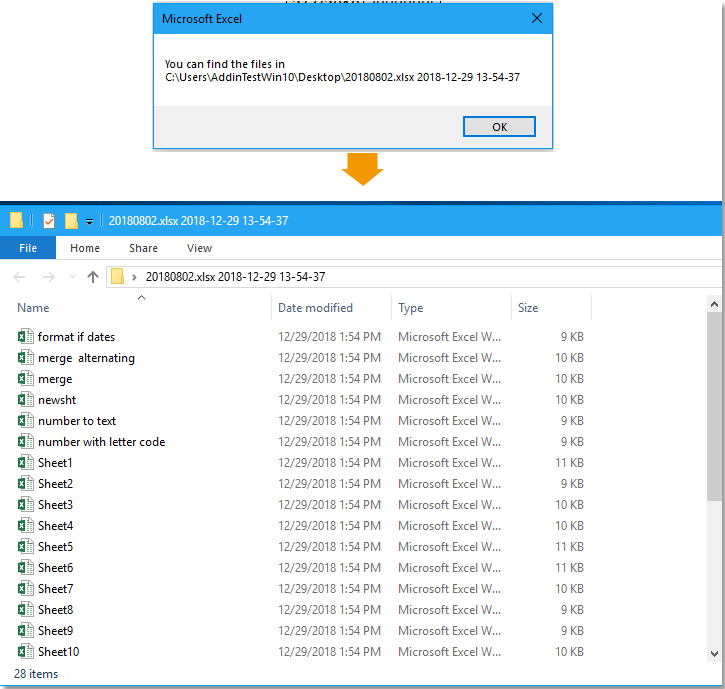
MsgBox "You can find the files in " & FolderName
Application.ScreenUpdating = True
End SubPasso 3: Pressione a tecla "F5" para executar este código. Uma caixa de aviso aparecerá informando a localização das novas pastas de trabalho exportadas, e todas as planilhas da pasta de trabalho original foram exportadas para algumas novas pastas de trabalho separadas nomeadas com as planilhas originais em uma nova pasta específica.
Demonstração: Exportar e salvar cada planilha como nova pasta de trabalho
Artigos relacionados:
- Combinar várias pastas de trabalho em uma única pasta de trabalho
- Salvar uma seleção como arquivo individual
- Dividir uma pasta de trabalho em arquivos Excel separados
Melhores Ferramentas de Produtividade para Office
Impulsione suas habilidades no Excel com Kutools para Excel e experimente uma eficiência incomparável. Kutools para Excel oferece mais de300 recursos avançados para aumentar a produtividade e economizar tempo. Clique aqui para acessar o recurso que você mais precisa...
Office Tab traz interface com abas para o Office e facilita muito seu trabalho
- Habilite edição e leitura por abas no Word, Excel, PowerPoint, Publisher, Access, Visio e Project.
- Abra e crie múltiplos documentos em novas abas de uma mesma janela, em vez de em novas janelas.
- Aumente sua produtividade em50% e economize centenas de cliques todos os dias!
Todos os complementos Kutools. Um instalador
O pacote Kutools for Office reúne complementos para Excel, Word, Outlook & PowerPoint, além do Office Tab Pro, sendo ideal para equipes que trabalham em vários aplicativos do Office.
- Pacote tudo-em-um — complementos para Excel, Word, Outlook & PowerPoint + Office Tab Pro
- Um instalador, uma licença — configuração em minutos (pronto para MSI)
- Trabalhe melhor em conjunto — produtividade otimizada entre os aplicativos do Office
- Avaliação completa por30 dias — sem registro e sem cartão de crédito
- Melhor custo-benefício — economize comparado à compra individual de add-ins