Como criar um calendário mensal/anual no Excel?
Em algumas ocasiões, você pode precisar criar um calendário específico para um mês ou ano no Excel. Como resolver isso rapidamente? Este tutorial apresenta truques para criar rapidamente um calendário mensal ou anual no Excel.
Criar calendário mensal ou anual usando Modelo do Excel
Criar calendário mensal usando VBA
Criar facilmente calendário mensal ou anual com o Calendário Perpétuo
Criar calendário mensal ou anual usando Modelo do Excel
No Excel, você pode usar um modelo de calendário para criar um calendário mensal ou anual.
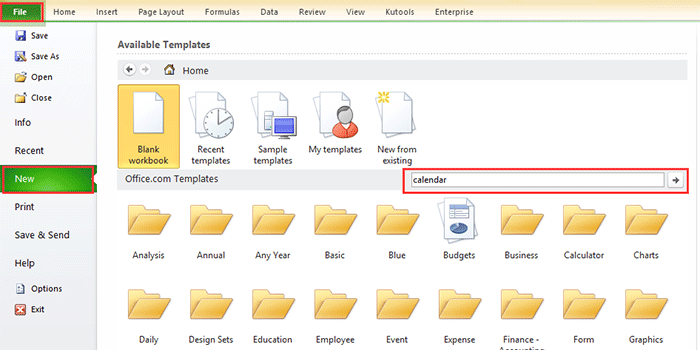
1. No Excel 2010/2013, clique em Arquivo > Novo; no Excel 2007, clique no Botão do Office > Novo, depois, na seção direita da janela que aparece, digite calendário no mecanismo de busca. Veja a captura de tela:
No Excel 2010/2013
No Excel 2007

2. Pressione Enter, então vários tipos de calendários serão listados na janela. Selecione o tipo de calendário que você precisa e clique em Baixar (ou Criar) no painel à direita. Veja a captura de tela:

Agora um calendário foi criado em uma nova pasta de trabalho. Veja a captura de tela:

Criar calendário mensal usando VBA
Às vezes, você precisa criar um calendário de um mês específico, como janeiro de 2015. Pode ser um pouco difícil encontrar um modelo de calendário assim com o método acima. Aqui eu apresento um código VBA para ajudá-lo a criar um calendário mensal específico.
1. Pressione as teclas Alt + F11 para abrir a janela Microsoft Visual Basic for Applications, clique em Inserir > Módulo, depois copie e cole o seguinte código VBA na janela.
VBA: Criar calendário mensal.
Sub CalendarMaker()
       ' Unprotect sheet if had previous calendar to prevent error.
       ActiveSheet.Protect DrawingObjects:=False, Contents:=False, _
          Scenarios:=False
       ' Prevent screen flashing while drawing calendar.
       Application.ScreenUpdating = False
       ' Set up error trapping.
       On Error GoTo MyErrorTrap
       ' Clear area a1:g14 including any previous calendar.
       Range("a1:g14").Clear
       ' Use InputBox to get desired month and year and set variable
       ' MyInput.
       MyInput = InputBox("Type in Month and year for Calendar ")
       ' Allow user to end macro with Cancel in InputBox.
       If MyInput = "" Then Exit Sub
       ' Get the date value of the beginning of inputted month.
       StartDay = DateValue(MyInput)
       ' Check if valid date but not the first of the month
       ' -- if so, reset StartDay to first day of month.
       If Day(StartDay) <> 1 Then
           StartDay = DateValue(Month(StartDay) & "/1/" & _
               Year(StartDay))
       End If
       ' Prepare cell for Month and Year as fully spelled out.
       Range("a1").NumberFormat = "mmmm yyyy"
       ' Center the Month and Year label across a1:g1 with appropriate
       ' size, height and bolding.
       With Range("a1:g1")
           .HorizontalAlignment = xlCenterAcrossSelection
           .VerticalAlignment = xlCenter
           .Font.Size = 18
           .Font.Bold = True
           .RowHeight = 35
       End With
       ' Prepare a2:g2 for day of week labels with centering, size,
       ' height and bolding.
       With Range("a2:g2")
           .ColumnWidth = 11
           .VerticalAlignment = xlCenter
           .HorizontalAlignment = xlCenter
           .VerticalAlignment = xlCenter
           .Orientation = xlHorizontal
           .Font.Size = 12
           .Font.Bold = True
           .RowHeight = 20
       End With
       ' Put days of week in a2:g2.
       Range("a2") = "Sunday"
       Range("b2") = "Monday"
       Range("c2") = "Tuesday"
       Range("d2") = "Wednesday"
       Range("e2") = "Thursday"
       Range("f2") = "Friday"
       Range("g2") = "Saturday"
       ' Prepare a3:g7 for dates with left/top alignment, size, height
       ' and bolding.
       With Range("a3:g8")
           .HorizontalAlignment = xlRight
           .VerticalAlignment = xlTop
           .Font.Size = 18
           .Font.Bold = True
           .RowHeight = 21
       End With
       ' Put inputted month and year fully spelling out into "a1".
       Range("a1").Value = Application.Text(MyInput, "mmmm yyyy")
       ' Set variable and get which day of the week the month starts.
       DayofWeek = WeekDay(StartDay)
       ' Set variables to identify the year and month as separate
       ' variables.
       CurYear = Year(StartDay)
       CurMonth = Month(StartDay)
       ' Set variable and calculate the first day of the next month.
       FinalDay = DateSerial(CurYear, CurMonth + 1, 1)
       ' Place a "1" in cell position of the first day of the chosen
       ' month based on DayofWeek.
       Select Case DayofWeek
           Case 1
               Range("a3").Value = 1
           Case 2
               Range("b3").Value = 1
           Case 3
               Range("c3").Value = 1
           Case 4
               Range("d3").Value = 1
           Case 5
               Range("e3").Value = 1
           Case 6
               Range("f3").Value = 1
           Case 7
               Range("g3").Value = 1
       End Select
       ' Loop through range a3:g8 incrementing each cell after the "1"
       ' cell.
       For Each cell In Range("a3:g8")
           RowCell = cell.Row
           ColCell = cell.Column
           ' Do if "1" is in first column.
           If cell.Column = 1 And cell.Row = 3 Then
           ' Do if current cell is not in 1st column.
           ElseIf cell.Column <> 1 Then
               If cell.Offset(0, -1).Value >= 1 Then
                   cell.Value = cell.Offset(0, -1).Value + 1
                   ' Stop when the last day of the month has been
                   ' entered.
                   If cell.Value > (FinalDay - StartDay) Then
                       cell.Value = ""
                       ' Exit loop when calendar has correct number of
                       ' days shown.
                       Exit For
                   End If
               End If
           ' Do only if current cell is not in Row 3 and is in Column 1.
           ElseIf cell.Row > 3 And cell.Column = 1 Then
               cell.Value = cell.Offset(-1, 6).Value + 1
               ' Stop when the last day of the month has been entered.
               If cell.Value > (FinalDay - StartDay) Then
                   cell.Value = ""
                   ' Exit loop when calendar has correct number of days
                   ' shown.
                   Exit For
               End If
           End If
       Next

       ' Create Entry cells, format them centered, wrap text, and border
       ' around days.
       For x = 0 To 5
           Range("A4").Offset(x * 2, 0).EntireRow.Insert
           With Range("A4:G4").Offset(x * 2, 0)
               .RowHeight = 65
               .HorizontalAlignment = xlCenter
               .VerticalAlignment = xlTop
               .WrapText = True
               .Font.Size = 10
               .Font.Bold = False
               ' Unlock these cells to be able to enter text later after
               ' sheet is protected.
               .Locked = False
           End With
           ' Put border around the block of dates.
           With Range("A3").Offset(x * 2, 0).Resize(2, _
           7).Borders(xlLeft)
               .Weight = xlThick
               .ColorIndex = xlAutomatic
           End With

           With Range("A3").Offset(x * 2, 0).Resize(2, _
           7).Borders(xlRight)
               .Weight = xlThick
               .ColorIndex = xlAutomatic
           End With
           Range("A3").Offset(x * 2, 0).Resize(2, 7).BorderAround _
              Weight:=xlThick, ColorIndex:=xlAutomatic
       Next
       If Range("A13").Value = "" Then Range("A13").Offset(0, 0) _
          .Resize(2, 8).EntireRow.Delete
       ' Turn off gridlines.
       ActiveWindow.DisplayGridlines = False
       ' Protect sheet to prevent overwriting the dates.
       ActiveSheet.Protect DrawingObjects:=True, Contents:=True, _
          Scenarios:=True

       ' Resize window to show all of calendar (may have to be adjusted
       ' for video configuration).
       ActiveWindow.WindowState = xlMaximized
       ActiveWindow.ScrollRow = 1

       ' Allow screen to redraw with calendar showing.
       Application.ScreenUpdating = True
       ' Prevent going to error trap unless error found by exiting Sub
       ' here.
       Exit Sub
   ' Error causes msgbox to indicate the problem, provides new input box,
   ' and resumes at the line that caused the error.
   MyErrorTrap:
       MsgBox "You may not have entered your Month and Year correctly." _
           & Chr(13) & "Spell the Month correctly" _
           & " (or use 3 letter abbreviation)" _
           & Chr(13) & "and 4 digits for the Year"
       MyInput = InputBox("Type in Month and year for Calendar")
       If MyInput = "" Then Exit Sub
       Resume
   End Sub
O VBA é proveniente deste site https://support.microsoft.com/en-us/kb/150774
2. Pressione a tecla F5 ou o botão Executar, e uma caixa de diálogo será exibida para lembrá-lo de digitar o mês específico para o qual deseja criar o calendário, veja a captura de tela:

3. Clique em OK. Agora um calendário de janeiro de 2015 foi criado na planilha ativa.

Mas nos métodos acima, existem algumas limitações. Por exemplo, se você quiser criar um calendário de janeiro a maio de uma só vez, precisará criar o calendário cinco vezes com os dois métodos acima. Agora eu apresento uma ferramenta prática para resolvê-lo de forma rápida e fácil.
Criar facilmente calendário mensal ou anual com o Calendário Perpétuo
Calendário Perpétuo é uma das poderosas utilidades do Kutools para Excel, e ele pode ajudá-lo a criar rapidamente um calendário mensal ou anual no Excel de uma só vez.
1. Clique em Kutools Plus > Planilha > Calendário Perpétuo.
2. Na caixa de diálogo que aparece, especifique a duração dos meses para os quais deseja criar o calendário e clique em Criar. Veja a captura de tela:

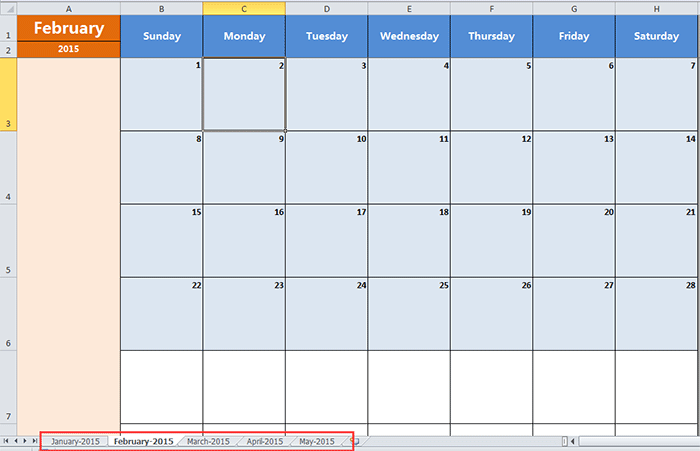
Então, uma nova pasta de trabalho será criada com cinco planilhas de calendário. Veja a captura de tela:
Dica:
Se você quiser criar apenas um calendário para um mês específico, basta selecionar o mesmo mês tanto na caixa de texto De quanto na caixa Para na caixa de diálogo.
Clique aqui para saber mais sobre o Calendário Perpétuo
Melhores Ferramentas de Produtividade para Office
Impulsione suas habilidades no Excel com Kutools para Excel e experimente uma eficiência incomparável. Kutools para Excel oferece mais de300 recursos avançados para aumentar a produtividade e economizar tempo. Clique aqui para acessar o recurso que você mais precisa...
Office Tab traz interface com abas para o Office e facilita muito seu trabalho
- Habilite edição e leitura por abas no Word, Excel, PowerPoint, Publisher, Access, Visio e Project.
- Abra e crie múltiplos documentos em novas abas de uma mesma janela, em vez de em novas janelas.
- Aumente sua produtividade em50% e economize centenas de cliques todos os dias!
Todos os complementos Kutools. Um instalador
O pacote Kutools for Office reúne complementos para Excel, Word, Outlook & PowerPoint, além do Office Tab Pro, sendo ideal para equipes que trabalham em vários aplicativos do Office.
- Pacote tudo-em-um — complementos para Excel, Word, Outlook & PowerPoint + Office Tab Pro
- Um instalador, uma licença — configuração em minutos (pronto para MSI)
- Trabalhe melhor em conjunto — produtividade otimizada entre os aplicativos do Office
- Avaliação completa por30 dias — sem registro e sem cartão de crédito
- Melhor custo-benefício — economize comparado à compra individual de add-ins